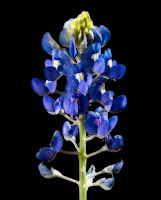
This is a neat effect I learned in a still life photo class at UT. The effect mimics an original technique devloped by Michael Orton where you overlay two overexposed images of an identical scene. One is sharply focused and the other blurry. The end result is a very saturated, soft focus effect which works great for flowers.
To acheive this effect in Photoshop, do the following:
- Open your image
- Duplicate the background layer and name it "Sharp"
- Duplicate the Sharp layer and change the blending mode of Sharp Copy to screen
- With Sharp Copy selected, right click and select Merge Down
- Duplicate the Sharp layer and rename layer "Out of Focus"
- Apply a Gaussian Blur to this out of focus layer. The amount of Gaussian blur will change depending on the image resolution and desired effect. You want it to be blurry enough to hide all detail, but general shapes are still visible.
- Change the blending mode of the Out of Focus layer to Multiply.
- Adjust opacity of the Out of Focus layer to taste.
 When done subtlely, it can also work well for portraits. I applied this to a picture I took of my friend Isaac and his fiance, but toned down the saturation slightly.
Check out the Orton Flickr Pool here
